Fa La Llama

IMG_9626

Peta Penguin

Christmas is all about traditions; such as, baking cookies, parties, big breakfasts, Christmas music, hanging stockings, and putting up the Christmas tree. It is hard to imagine how we would make it through the dark winter months without this festive time of year. I might actually enjoy Christmas even more now as an adult than I did as a child. I can carry on traditions from my childhood as well as creating new ones.

Every year I like to have a new ornament for my Christmas tree. Decorating the tree is a walk down memory lane. I have an ornament made by both my kindergarten and first grade teachers. I also have ornaments made by relatives and ornaments from around the world given to me by friends.

Last year I started a knitted Christmas ornament series with the Peta Penguin ornament. Peta was worked in fingering weight yarn using intarsia in the round. Always the fashionable penguin, Peta is sporting a red winter hat.

This year I am continuing the tradition with the Fa La Llama. My family is quite taken with llamas and have showed more interest in this cutie than any of my previous knitting projects. They have offered me plenty of advice on what would make the llama the cutest llama that it could be. Currently I am finding my “test llamas” all over the house and riding on my spinning wheel. It must be elves.

IMG_1309

Fa La Llama

The Fa La Llama is worked in worsted weight yarn and is shaped using short rows. The legs and ears are made using i-cord. The tail is braided. Since all fashionable ornaments must be appropriately dressed, this llama is wearing a festive red scarf.

The pattern incudes four pages with plenty of photos to show you exactly how the llama is assembled. I plan to hang a llama on my tree and to use a couple more to trim packages. Since they are a pretty quick knit maybe everyone will get one this year!

As my Christmas gift to the knitters of the world, I am offering the pattern for free on Raverly through the end of December. If you love Peta Penguin and the Fa La Llama be sure to follow me on Facebook, Instagram, Twitter, or WordPress to make sure that you don’t miss next years pattern!

Download the Fa La Llama in my Ravelry store here!

The Bohemian Afghan

I grew up in upstate New York and now live in Michigan. As you can imagine staying warm is a top priority for me in the winter. I am always looking for a warmer mitten pattern or making double-knit hats for that added bit of warmth.

Last winter I got the urge to make the warmest afghan ever while also using up my scrap yarn. What I did not anticipate is how much fun I would have knitting this afghan. The afghan does not contain a single purl stich which I am sure would make Elizabeth Zimmerman happy. Knitting the Bohemian Afghan has been very meditative and also makes great knitting for watching TV or reading.

IMG_1265

Last winter I knit about half of this afghan. When I picked it back up this fall I was so happy to have it cover my toes as I worked. The biggest problem I had was that my dog kept laying on the bottom end so that it was impossible to flip it over and knit in the round without disturbing her. At other times the cat and dog would fight over who got the blanket.img_6750

The Bohemian Afghan is worked in the round and sealed on both ends to create a double layer of fabric. If you are particular about such things you can weave in the ends. If you hate weaving in ends (like me) you can just tuck them between the layers and forget them.

While I am sure the more experienced among you can knit up a similar design, I am releasing the pattern in my Ravelry Store for those knitters who don’t want to reinvent the wheel or for those who would like some tips on the techniques used.

Chain stitch

A photo from the cast-on tutorial.

The pattern includes 5 pages of instructions and photo tutorials so that it can be knit by a beginning knitter.

In addition, I have also release a large print version of the pattern on Ravelry. My reading vision is rapidly getting worse. The settings on most of my devices are set to large print and I really enjoy my e-reader for reading because I can make the words as big as I want.

Large print example

Page 2 of large print version

It occured to me that I would be wonderful to have a large print version of knitting patterns as well. The large print version of the pattern is expanded from 5 pages to 13. In the days of magazines, making patterns in large print would have been expensive but in the days of downloadable files this convenience is of no consequence.

With the many color options for the Bohemian Afghan I am very excited to see how other afghans turn out. With this pattern no two will be alike!

___ of the Month

When knitting started taking off on the Internet Sock of the Month clubs and other knitted item of the month clubs soon followed. It was a great idea. I started designing in the Six Socks Knitalong which gave knitters a new, exclusive sock pattern to knit every two months. What is better than something new to knit on a regular schedule?

This concept, of course, was not new. Elizabeth Zimmerman did the same thing in 1974 with her Knitter’s Almanac.

IMG_1263

Recently I got the urge to look through the Knitter’s Almanac again. There is something so appealing about a different pattern to knit each month. I also just love Elizabeth’s style of writing. It is like she is sitting in your living room talking you through the pattern.

Not only did she create a pattern of the month club but she also blogged long before knitting blogs were a thing. The book describes her writing chapters while out canoeing and how to teach children to knit. Even if you never knit a thing in the Almanac, the book is a fun read.

One of my favorite quotes by Elizabeth Zimmerman explains why purling is so much more difficult than knitting:

“Why do so many of us object to purling? Is it because as children we are taught to knit first, and then presented with purling as the second and more difficult option. Who knows. Who is willing to take a little innocent child and teach it to purl first? You must admit it is the trickier of the two.” -Elizabether Zimmerman, Knitting Without Tears

I have often thought, sometime when I have a year to spare, I will knit through her whole almanac. Elizabeth lists the patterns under the best month to knit each as follows:

January: An Aran Sweater

February: Some Babies’ Things

March: Difficult Sweater

April: Mystery Blanket

May: Mittens for Next Winter

June: Three Hats

July: A Shawl

August: Christmas Fiddle-Faddle in the Wilds

September: Nether garments

October: Pullover

Novmeber: Moccasin Socks

December: Last-Minute Sweater

Of these projects, the one that intrigues me most is the nether garments. By nether garments, Elizabether is referring to knit leggings. A picture of wonderful fair isle leggings is included in the book. In her true fashion, you will not find line by line instructions but rather instructions on how to go about creating leggings that will fit your body. This is the advantage of knitting ones own clothes. You can create items that fit and are not one size fits all. The results are beautiful. I definitely recommend checking out the finished projects on Ravelry.

A couple other projects found in this Almanac that have gone viral, one might say, are the Feburary Lady Sweater and the Pi Shawl. The February Lady Sweater was adapted from the baby sweater to be knit in February. The Pi Shawl really includes instructions on how to knit your own circular shawl your own way in July.

While this book does not do the line by line handholding of most patterns, I think it has made many knitters more couragous. As written in her dedication to this book:

IMG_1264

The Journey of a Sweater Front

I finally finished the front of my Fulmar sweater. All 292 rows of it. And since I cast on 216 stitches, the front consists of around 63,000 stitches in total. To make the pattern even more difficult, the sweater is knit using a light worsted weight yarn but size 1 needles. It is a very dense sweater and certainly not a quick knit. IMG_1229

How long did this take me, you might ask? This is the most embarassing part. When I checked on Ravelry I found that it took me 12 years. At this rate, I will be 71 years old when I finish the sweater. It might be time to step up the pace.

When I think about my journey knitting this sweater a lot of memories emerge. I bought this yarn at my local yarn store and used to work on it during a weekly knitting group there. The yarn store closed around 10 years ago. My friend whom I met at this knitting group, Trish, really loved this sweater. Sadly she died from breast cancer around 5 years ago. I am sure she would love for me to finish knitting Fulmar.

One of the biggest problems that relegated this sweater to hibernation has been an issue of weight. Some time ago I lost a lot of weight and then was not sure what to do with my half finished sweaters that would no longer fit. Since then I have gained some of the weight back. The up side is that these sweaters will probably be wearable again.

IMG_1233

Dear Younger Self,

Yes, that sweater is beautiful and a piece of art. But it will take you forever to knit and you will want to knit something else. Maybe you should chose a quicker project.

Sincerely, Me

Sadly many people do not listen to me, including my past self.

Fulmar comes from the book, Aran Knitting by Alice Starmore. Not only does this book have lovely patterns but it also has excellent instructions on aran stitches and designing your own aran sweaters. Even if you do not intend to ever knit an aran sweater, the book is worth checking out to read about the history of aran knitting. In particular, Ms. Starmore debunks the myth that aran sweaters included family patterns to help identify fishermen lost at sea.

While you are looking at the book, I would also recommend checking out my other favorite patterns. St. Brigid has a particularly intriguing colar with a cable going around the neck. The Irish Moss pattern is suitable for men and women. The cable pattern on this sweater lies fairly flat and does not make the sweater look bulky.

Fun Feet: The Como Te Llama Socks

Intarsia seems to be the Cinderella of the colorwork knitting world. It comes out beautifully but no one really wants anything to do with it. Stripes, fair isle, stranded knitting, and mosaic knitting all seem much more appealing to knitters. I do like intarsia for a few reasons, however.

IMG_1104

  1. Intarsia maintains the elasticity of the knitting. Particularly when knitting socks, I like my knitting to be stretchy. There is nothing worse than having a sock that will not stretch enough to fit over your heel or that sags because it does not conform to your calf. Stranded knitting has very little elasticity so I generally avoid it for socks. (And yes, I have frogged entire socks because I could not get them over my heel. A sad thing indeed.)
  2. Intarsia is the easiest way to make pictures in your knitting. The number of colors or designs you can make are only limited by your imagination and a grid.
  3. Intarsia only requires carrying your yarn in one hand. While I am fine knitting stranded projects with both hands, carrying the yarn in one hand leaves me with one less thing to worry about.IMG_9626
  4. Intarsia can be worked both in the round and flat. Yes, intarsia in the round does exist although counter-intuitively you still need to knit back and forth. Peta Penguin is a small project that introduces this technique.

I do admit that there is a downside to intarsia which may account for it’s bad reputation. If you are using a number of colors it is not uncommon for the bobbins to get tangled in each other. Obviously no one likes to spend precious knitting time untangling yarn. My recommendation is to keep your yarn short on your bobbins and tangling will be less of a problem.

IMG_1109 (2)Recently my kids have become passionate about fun socks. They have bought socks with pictures of everything from avocados to hedgehogs, from Mackinac Island to Mammouth Caves. It seems about anything you can imagine has been printed on a sock. As a result, I decided it was time to start making my own fun socks. Since knitters everywhere love fiber-bearing animals I started by designing a llama sock. I opted for IMG_1103intarsia to preserve the elasticity of the fabric. I also decided to knit the leg back and forth with a seam because the invisible seam generally looks neater than intarsia in the round.

However, I used semi-solid yarn for the contrasting color so the seam is somewhat visible where the color changes occur. The seam also should not cause any chaffing or blisters since travels down the back of the leg but does not extend to the heel or foot.

While I usually knit socks from the top down, this pattern made more sense to me when knit from the toe up. Again I used an elastic heel because nothing bothers me more than knitting a sock and not being able to get it over my ankle.

The Come Te Llama Sock pattern is now available in my Ravelry Store. I hope you enjoy it!

The Magic of Blocking

Whenever I come across someone on the Internet blocking, I pay close attention. That is where the magic happens and I love to watch. Especially when knitting lace or stranded projects, blocking smooths out the stiches and opens up the pattern to reveal its true beauty. Blocking often transforms the ugly duckling into a swan.

After an embarassingly long time in hibernation, I have finally finished my Latvian mittens. Luckily I did not include a start date on Ravelry The only comment on the project was from over 7 years ago though. This might be a record for second mitten syndrome.

After finishing the second mitten, I did not procrastinate in blocking it at least. I dug out my trusty mitten blocker. Yes, it looks like a wire coat hanger because it is one. I have shaped it into a mitten size and just slide the mitten on after washing. The important part is that the hanger is coated so that it does not rust and stain your mitten.

IMG_1074Blocking evens out the stitches as well as stretching the fabric longer and wider. You can see the significant difference between the blocked and unblocked mitten.


The other thing I love about these mittens is the invisible thumbs. The pattern on the thumbs is identical to the pattern on that section of the mitten whether the thumb is facing up or down.

IMG_1079

It seems I may be ready for winter although I am fine if it holds off a bit!


Tink is Knit Spelled Backwards

My mom taught me to knit as a kid. By the time I was 16 I was knitting almost every day. This was lucky timing because if ever I had a problem or question I would ask my mom how to follow the pattern instructions or how to fix an error.

I often feel for people who learn to knit from videos or at yarn stores because they do not have that help right there whenever they need it. In my LYS (local yarn store), the owner would ask people What-Would-Laura-Ingalls-Do? I believe that she was trying to get across the idea that Laura would figure it out on her own because she had no LYS to visit for help. Really though Laura Ingalls would have asked her mom when she was first learning. And if the project was particularly complex she likely would have called on the expert knitter across town.

As a result, on occasion a friend will drop by with a knitting problem. Sometimes a dropped stitch, a confusing instruction, the wrong number of stitches between markers, or any number of things. This week a friend came by after having missed some yarn overs on a lace piece. So as to dropping stitches when unraveling, I showed her how to tink.

What is tinking? Knitting spelled backwards so, in essence, unknitting your piece. Sometimes I am able to drop a stitch and correct the problem by laddering down and back up. Other times I can just rip the piece back to the error and put the stitches back on the needles. When the piece is complex, the error is not simple to correct, and the yarn is slippery, knittinking becomes necessary unless you have resigned yourself to starting over.

In this example, I am knitting a tan row on top of a red row to more visibly illustrate the method. Obviously when knitting, you are placing the right needle through the next loop on the left needle and behind the left needle.

When tinking you will do the following:IMG_1041

  1. Place the tip of the left needle in the front of the stitch below the stitch you just knit. In this case, you would be placing your left needle through the front of the red stitch. (Placing your needle through the front of the stitch will ensure that the stitch is in the correct direction on the left needle).
  2. Pull the last stitch worked off the top of the right needle. In this example you would slip the last tan stitch off of the right needle.
  3. Pull the tan yarn to unravel the stitch.
  4. Repeat steps 1-3 until you have reached the section of your knitting that you need to correct.

This method enables you to be able to unravel your knitting stitch by stitch while correctly positioning the stitches from the previous row on your needles.IMG_1043 (2)

When tinking lace, you will sometimes need to make sure that you are returning both stitches from the previous row to the needle in the case of a knit 2 together or slip slip knit. You may also need to completely drop a yarn over. If you find yourself in need of tinking, I recommend practicing with a two color swatch first to make sure you have the hang of it before trying to manage a thin or slippery yarn.


The Just-One-More-Row Project

We all know about page-turners. Those books you just can’t put down. You start it and then the next thing you know you are done and feeling sad and empty. Often you neglect your family and friends just to fit in a few more minutes of reading.

I admit that reading the Twilight series was like that for me. I don’t even like vampires or even romances all that much but something about these books kept me reading straight through four books. It makes no sense that one can find themself consumed by a book they had no interest in reading. Character development in books plays a large role in my love for a book. The book needs to be easily readable. Books that jump around to a different character every chapter seldom draw me in. In addition, a page-turner can not be overly predictible. There must be the right amount of surprise and cliff-hangers.

Knitting seems to follow the same trajectory. Some knitting projects are just “page-turners” where you find yourself staying up a little later just to get to the next part or you always find yourself saying “just one more row.” With these projects it does not even seem to matter if you want the finished project, it is all about the process.

Here are some things that I think make a project a just-one-more-row project:

Gathered_2_small2The right balance of new and easy. A project should have some easy sections that you can just fly through while having other parts that capture your attention. This may include a new type of construction or an interesting stitch pattern. The Gathered Pullover was one of the quickest sweaters I have ever knit. It started at the hem in the round. By the time I got sick of knitting stockinette stitch I was almost to the knot at the bust. Much like a cliffhanger I had to continue to find out what the knot would look like, then I was almost done with the body of the sweater. At this point, I only had the sleeves left.

Likewise knitted lace keeps me knitting because you have a break from the lace pattern when you work a plain row every other row. Generally I prefer lace with predictible patterns so that I do not need to consult the pattern for every stitch.


Changes in color also can keep a project moving. Self-striping yarn became so popular because knitters just needed to see how the project would look when they worked the next stripe. The same effect also takes place in colorwork projects; such as, Fair Isle or Intarsia. Currently I am making Intarsia socks and I am eager to see the picture develop.

In sock knitting I am most likely to neglect my project between the heel and toe. For that reason I like a sock pattern to have something of interest in that area. While I generally do not knit many socks toe-up, I do find the toe-up sock holds my interest better because by the time I become bored I am working on the cuff pattern.

Finally I think the just-one-more-row factor can depend on your mood. Maybe you are dealing with a lot of stress at work and you just need to knit one mindless row after another. Maybe you feel the need for a challenge and you want a complex chart. Sometimes it is just looking within yourself and thinking, “What will really inspire me today?”


Book Review: Vogue Knitting, The Ultimate Knitting Book

This year Vogue Knitting magazine updated their book Vogue Knitting: The Ultimate Knitting Book. Since Vogue Knitting has always been one of my favorite magazines I checked it out of the library to see what I thought. I was not disappointed. The book contains 351 pages and one and a half pounds of nothing but good information. (Yes, I weighed it.)

vogue

vogue 3Vogue Knitting: The Ultimate Knitting Book contains both color pictures and hand drawings of individual stitches on virtually every page. The book begins with information on different yarn types, knitting needles, and notions. Apparently there is paper yarn even. Everyone can learn something new in this book!

Next the book discusses basic stitches. One of my favorite section is the casting on section which includes 25 different cast ons. The chapter goes on to include 14 different bind offs.  Each explanation includes a photograph of the finished cast on or bind off, a drawing illustrating how technique is executed, and step by step written instructions. The chapter also includes tips to make your execution neater.

vogue 2

Subsequent sections illustrate how to work cables and various colorwork techniques including intarasia, stranded knitting, stripes, mosaic, and plaid. The book includes many other knitting techniques including lace, entrelac, circular knitting, brioche, and double knitting. Each section includes color photographs, drawn illustrations, and written instructions. The publishers made this book even more aestetically pleasing by using one color of pictures and drawings for each section.

Recently when people want to learn a new knitting technique they look up a video on the topic. I must be an impatient person because I don’t enjoy watching a 20 minute video to learn how to do a simple technique. Usually an illustration would be enough to refresh my memory in 30 seconds. If I was learning a completely new technique I would also read the written instructions and maybe compare my result with the photograph in this book. I find this book much more useful than sorting through modern internet instructions.

The last half of the book includes tips for following patterns and instructions for vogue 4designing your own garments. The book also includes a section on finishing techniques. The chapter on designing sweaters extends across  75 pages. This expansive guide covers sizing, different types of body and sleeve shaping, collars, pockets, buttons, and zippers. Another chapter contains 15 pages on designing shawls. The section includes square, rectangular, triangular, circular, and crescent shaped shawls.
While the book does contain a short section on accessories, most knitters would do better to consult another book for any more than basic socks, mittens, and hats. The book only contains four types of sock heels and two types of toes. Furthermore, these instructions only include written directions and photographs of the final product.

The other item this book lacks is any type of stitch dictionary. If you are looking for an encyclopedia of stitches you should look elsewhere. Chances are this information was omitted to keep the book from breaking  the two pound mark.

In conclusion, Vogue Knitting: The Ultimate Knitting Book will be making its way onto my Christmas list this year. I anticipate that this book will be my go to book for any knitting technique information.

Kid’s Craft: Easy Friendship Bracelet

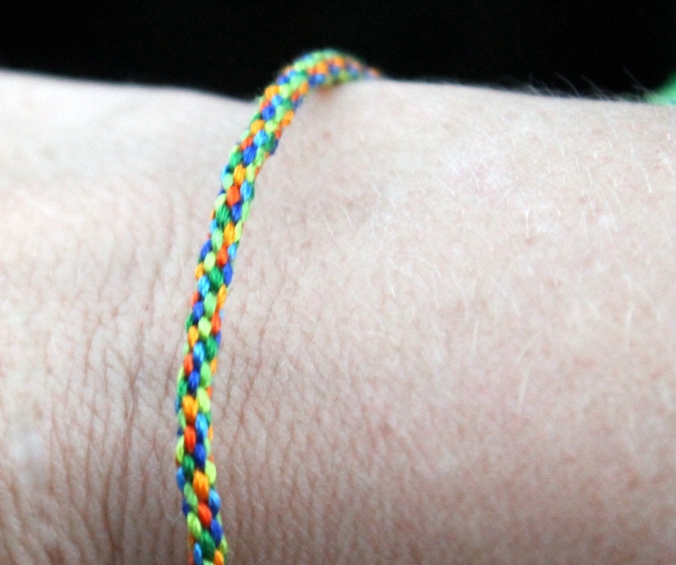
Over the past weekend, I hosted a Girl Scout bonfire event. Friendship bracelets are always a fun craft but there were many 6 year old girls in attendence and tying knots can be difficult for small hands.  I decided to have the girls make a different bracelet that does not require any knot tying other than an overhand knot at the beginning and end.

I was surprised to find that the adults were enjoying bracelet-making as much as the kids. These super-easy friendship bracelets are a great activity for almost anyone ages 5 and up. It is also easy enough to prep that you can use this craft with large groups. (I made over 40 bracelet makers for our bonfire night.) When my children were small we kept these bracelet-makers in the car to work on when driving around.

Bracelet 8

Super-easy friendship bracelet

What you need:

  • 1 – sheet of plastic or cardboard
  • 7 – 18-inch lengths of embroidery floss
  • Scissors
  • Hole punch (optional)

To make a bracelet maker, cut a circle out of cardboard or a sheet of plastic. My circle is 2 1/4-inches in diameter. You will also need to cut a circle out of the middle of the circle. To make this easier, I just used a hole punch to punch the entire way around the center. Next you need to cut 8 slits evenly around the outside of the circle.

Next pick out 7 colors of embroidery floss and cut an 18-inch length of each color. Tie them together using and overhand knot and put one strand of thread in 7 out of the 8 slits.

You might notice that I have drawn blue arrows on the bracelet makers. I drew these on to make sure that you always work in the same direction. It does not matter which direction you go in but you should not reverse half way through. Likewise it does not matter in which order you put your colors. The bracelet does not stripe or make a similar pattern.

To make the bracelet you will need to count back 3 threads from the empty slot. Pick up this thread and place it in the empty slot. (You will be jumping over 2 threads with each thread.) Repeat this step by counting back 3 more threads from the new empty slot. Repeat this step about a gazillion more times until you have a bracelet. It is simple and I find it very meditative.

After you work the bracelet a few times around the bottom should look like this:

bracelet 7

When your bracelet is long enough, take it off the bracelet-maker, tie another overhand knot, tie it around your wrist, and enjoy!